
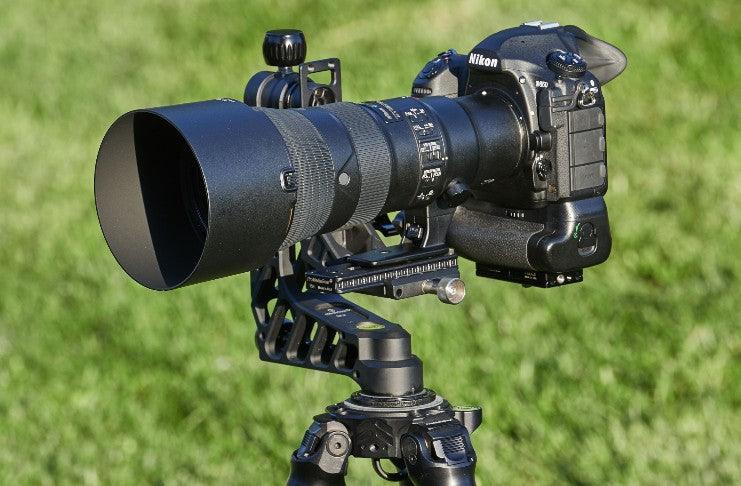
ProMediaGear lens plates are created for super-telephoto lenses with collars. These plates are essential in attaching the camera to a tripod.
There are three models available from ProMediaGear. The PX4, PX6, and PX8 lens plates look the same but their usage differs from one lens to another.

What is a lens plate?
Before heading on to the different ProMediaGear lens plates, let us first determine their purpose.
A quick-release lens plate works the same as a camera plate. It is used to attach your camera to a tripod or gimbal.
Why use a lens plate if a camera plate works the same?
The advantage of using a lens plate is the proper balance when using a heavy telephoto lens. When using the camera plate with a telephoto lens attached, the system becomes front heavy.
Huge telephoto lenses weigh more than the camera. Sometimes these lenses are three times heavier. Attaching it to a tripod via a lens plate is the logical choice. It makes the camera setup steady with a better balance overall.
There are durable ball heads in the market such as the ProMediaGear BH1 that can support cameras with heavy lenses. But an unbalanced body may affect the image quality. There is also a possibility of your camera tipping over when shooting.
That is when a lens plate comes in. It helps in balancing the camera and the lens. It also used to achieve the best balance of your setup for easier photography. With a lens plate, making adjustments require minimal effort.
Lens plates attach to the tripod collar of a telephoto lens with a standard 1/4"-20 screw. If you have a bigger lens, it may require a 3/8"-16 screw. Instead of having the camera plate support all the weight, the lens plate takes care of the job.
Using one is better as lens plates are positioned in the center of the whole camera system. With its position in the middle, the weight distribution is evened out. It is also adjustable to find the perfect center balance.
Another advantage of using a quick release plate is the Arca-Swiss system. Screwing a lens collar to a tripod is a tedious task. With an Arca-compatible lens plate, removing or adjusting the position is easier. You only have to loosen one knob, insert the plate and lock it in. Removing a camera with an Arca-Swiss system requires little effort as well.
This makes shooting quicker. Instead of spending time adjusting your position, you can focus on your subject and nailing the shots instead.
That being said, here are the three different ProMediaGear lens plates.

ProMediaGear PX4 vs PX6 vs PX8
The ProMediaGear PX4 is the shortest lens plate offered by the company. It is made of T6061 Aircraft aluminum with a 4.5-inch balancing slot.
This lens plate has an SS2 or QD quick release strap adapter port with different adjustable lens foot safety stops. The SS2 adapter makes it easier to carry the camera if you are using an SS2 compatible strap.
A ProMediaGear PX4 and PX6 plate with a QD compatible port will be available soon.The PX8 QD compatible version will follow soon.
Moreover, the anti-rotation pins keep the lens foot in place. You can adjust it to the lens foot to prevent t it from shifting its position.

But what makes it different from the ProMediaGear PX6 and the ProMediaGear PX8.
As the name implies, the different lens plates differ in length. Each model corresponds to how long and heavy your lens is. The PX4 goes for shorter telephoto lenses, while the PX6 and PX8 are made for the huge lenses.
Besides the length, the PX4 is lighter at 85 grams. The PX6 weighs 107.73 grams while the PX8 weighs 136.08 grams.
Moreover, the PX8 is available with either a C60 or a C40 Arca-compatible clamp.
That being said here is the compatibility list for each lens plate. Do take note that there are lenses that are not included in the list. However, you can determine which plate is compatible based on similar lenses listed.

ProMediaGear PX4
- Canon 300mm f/2.8 IS I
- Canon 65mm f/2.8 1-5x Macro
- Canon 100mm f/2.8 Macro IS and non-IS
- Canon 180mm f/3.5 Macro
- Canon 28-300mm f/3.5-5.6 IS
- Canon 35-350mm f/3.6-5.6 IS
- Canon 70-200mm f/2.8 non IS and IS
- Canon 70-200mm f/2.8 IS II and IS III
- Canon 70-200mm f/4 non IS, IS, and IS II
- Canon 70-300m f/4-5.6 IS
- Canon 100-400mm f/4.5-5.6 IS and IS II
- Canon 200mm f/1.8
- Canon 200mm f/2.0 IS
- Canon 200mm f/2.8 IS II
- Canon 300mm f/2.8 non-IS and IS II
- Canon 300mm f/4 IS
- Canon 400mm f/4 DO IS I and DO IS II
- Canon 400mm f/5.6
- Nikon 200-500mm f/5.6 E VR
- Nikon 300mm f/2.8 AF-S (I & II)
- Nikon 300mm f/2.8 VR (I & II)
- Nikon 400mm f/3.5 (Manual Focus)
- Nikon 500mm f/4 AI P
- Nikon 600mm f/5.6 AI-S
- Nikon 80-200mm f/2.8
- Pentax 300mm f/2.8 AF SMC P-FA
- Pentax 300mm f/4 SMC-DA
- Pentax 400mm f/2.8 SMC A
- Sigma 120-300mm f/2.8 DG
- Sigma 120-300mm f/2.8 DG OS
- Sigma 120-400mm f/4.5-5.6 DG OS
- Sigma 150-600mm f/5-6.3 Contemporary
- Sigma 500mm f/4.5 non-HSM
- Sony 600mm f/4 GM OSS
- Sony 200-600mm f/5.6-6.3 FE G OSS
- Sony 300mm f/2.8 G SSM I and II
- Tamron 150-600mm f/5-6.3 VC
- Tamron 150-600mm f/5-6.3 VC G2
- Leica 90-280mm f/2.8-4
- Olympus 300mm f/2.8 Zuiko
- Panasonic 100-400mm f/4-6.3 OIS

ProMediaGear PX6
- Canon 200-400mm f/4 IS ext. 1.4
- Canon 400mm f/2.8 IS I
- Canon 400mm f/2.8 IS II
- Canon 400mm f/2.8 IS III
- Canon 500mm f/4 IS I
- Canon 500mm f/4.5 non-IS
- Canon 600mm f/4 IS I, IS II, and IS III
- Canon 800mm f/5.6 IS
- Nikon 180-400mm f/4 FL VR TC1.4
- Nikon 200-400mm f/4 VR I and VR II
- Nikon 400mm f/2.8 FL VR
- Nikon 500mm f/4 AF-I
- Nikon 500mm f/4 AF-S (I and II)
- Nikon 500mm f/4 FL VR
- Nikon 800mm f/5.6 FL VR
- Olympus 90-250mm f/2.8 Zuiko
- Pentax 150-450mm f/4.5-5.6 D-FA AW
- Sigma (any lens with a TS-41 Collar and foot)
- Sigma 50-500mm f/4.5-6.3 APO
- Sigma 150-500mm f/5-6.3 APO
- Sigma 150-600mm f/5-6.3 Sports
- SIgma 80-400mm f/4.5-5.6 APO OS
- Sigma 120-300mm f/2.8 DG OS Sports
- Sony 400mm f/2.8 GM OSS
- Sony 500mm f/4 G SSM

ProMediaGear PX8
- Canon 400mm f/2.8 non-IS
- Canon 600mm f/4 non-IS
- Canon 600mm f/4.5 manual focus
- Canon 800mm f/5.6 manual focus
- Nikon 400mm f/2.8 AI-S and AF-I
- Nikon 600mm f/4 AI-S
- Nikon 600mm f/4 AF-I
- Nikon 600mm f/4 FL VR
- Sigma 300-800mm f/5.6 APO
- Sigma 500mm f/4 OS Sports
- Sigma 500mm f/4.5 APO
- Sigma 800mm f/5.6 APO
- Pentax 250-600mm f/5.6 SMC P-FA
- Pentax 560 f/5.6 DA AW
- Pentax 600mm f/4 SMC P-FA
- Konica Minolta 600mm f/4 APO G
As an additional note, some lens feet have two screw holes with different sizes. Most of the time the smaller hole is a 1/4"-20 thread size. The larger one would be a 3/8"-16 screw size.
For these larger holes, ProMediaGear is selling A23 screws separately. This is 3/8"-16 in size which is perfect for lenses with a 5/32” head. For the bigger theads, the head size on these screws are kept the same. You can use the very common size 5/32" or 4mm Allen key.
How to choose a lens plate if your lens is not on the list?
There are hundreds, if not thousands, of lenses available today. It is difficult to list down everything as it would take forever. However, that does not mean that you cannot get a lens plate for your lens.
For example, the Sony 70-200mm f/4 FE G OSS Lens is not included on the list earlier. But it is compatible with either the PX4 or PX6.
There is another option worth considering as well. The smaller ProMediaGear PX3 plate is a universal plate meant for camera bodies. However, it can be used on small lenses with short collars. Though the PX3 is not a lens plate, multiple customers have used it on their telephoto lenses especially the 70-200mm lens.
That being said, if you are unsure about your lens, the ProMediaGear PX6 is the way to go. The longer plate can accommodate more lenses. These plates are adjustable so even if it is longer than needed, it would still work.
The ProMediaGear PX6 is included in other ProMediaGear products such as gimbal heads most of the time. This is due to its versatility and wide range of compatibility.
If you have a lot of lenses and you want a one-size-fits-all plate, the PX6 is definitely the way to go.
Though if you have a small lens, then the PX4 is a great buy. The PX8 is reserved for humongous lenses such as the Sigma 800mm f/5.6 APO.
How to set up your ProMediaGear lens plate?
If you already have a lens plate, then the setup is easy. It only takes a few minutes to attach and balance your equipment.
Step 1: Check all the included parts
All ProMediaGear lens plates include the lens plate, 2 pieces 1/4"-20 screws, and a set of Allen keys. The smallest Allen key is used for the safety stops crews. The medium Allen key is for the anti-rotation pins. Lastly, the largest key is for attaching the lens plate to the lens.
Step 2: Attach the lens plate to the lens
Hold your lens with the foot facing upwards. Check the lens plate and determine the face with the anti-rotation screws, this face should be attached to the lens.
There are anti-rotation pins located on the lens plate, it is up to you if you want it on the front or the back of the lens foot. It depends on how you would balance the whole camera later.
Set the lens plate flat into the lens foot. Make sure it is parallel. Insert the 1/4"-20screw to the bottom of the lens. Tighten it with the included Allen key.
If you are going to use two screws, slide the plate until the screw holes are accessible. Otherwise, you may use one screw but make sure that the anti-rotation screws are in place.
Some lenses require 3/8"-16 screws. The ProMediaGear A23 screws are not included in the default package and are sold separately.
To check if you need a 3/8"-16 screw, you have to check the lens foot if it has two holes. If there are two holes of the same size, then both use a regular 1/4"-20 screw.
However, if there are two different-sized holes, then the larger one is 3/8"-16 while the other one uses the standard 1/4"-20 screws.
If you are still unsure of the lens foot screw size, check if the lens foot thread is the same size as your camera mounting thread. If it is the same, then it uses a 1/4"-20 screw.

Step 3: Check the SS2 Adapter system or the QD strap support
Once the quick release lens plate is attached, you may then go ahead and shoot some photos. However, one feature of the ProMediaGear template is the SS2 Quick Release Strap Adapter system.
If you have an SS2 QR strap, it is time to test the screw hole. Make sure that it fits snugly and works perfectly.
The same works for the upcoming PX4, PX6, and PX8 lens plates with QD strap support. Always check if the screw hole is tight. Lenses and cameras are expensive, so please take time to make sure that these strap connections are secure.
In addition, several customers add an extra layer of protection to their setup. They attach a separate lanyard to the lens loop to keep it secure. We will talk more about that in the future.
How to balance the camera and the lens?
Now that the lens plate is attached, it is time to test it out. But, there is another adjustment that needs to be made. Not all cameras and lenses weigh the same so balancing your setup is needed.
To do that, you have to hold the camera and lens. Lightly loosen the tilt lock knob and make sure that the arm moves freely. Slightly loosen the Arca-Compatible clamp as well. You can now slide your camera forward or backward.
Gently move your camera to the front or to the back to check its balance. If the lens is pointing down, then adjust the camera to the back. If the camera is back heavy, counter it by moving the camera forward.
Once you find the perfect balance and everything is centered, lock the system securely. Double-check and tighten all the knobs after.
That’s it! You are now ready to take your camera outside and shoot with your ProMediaGear Lens Plate on. Do not forget to follow us on Facebook and Instagram @promediagear for more product updates. Also, subscribe to our YouTube channel for shooting tips, tricks, and product reviews.
Comments
Looks great, and just in time. I need one!