
Star trail photography is an amusing and exciting experience. If done properly, the result is a stunning night shot that captures stars moving in the sky.
Photographing star trails is a rewarding experience. However, it is not easy. It requires a lot of patience. There are some accessories that you need to make it easier as well.
If you consider yourself a patient person and you think you are ready. Here is a comprehensive guide to star trail photography.
Learning the basics: regular vs circular star trails
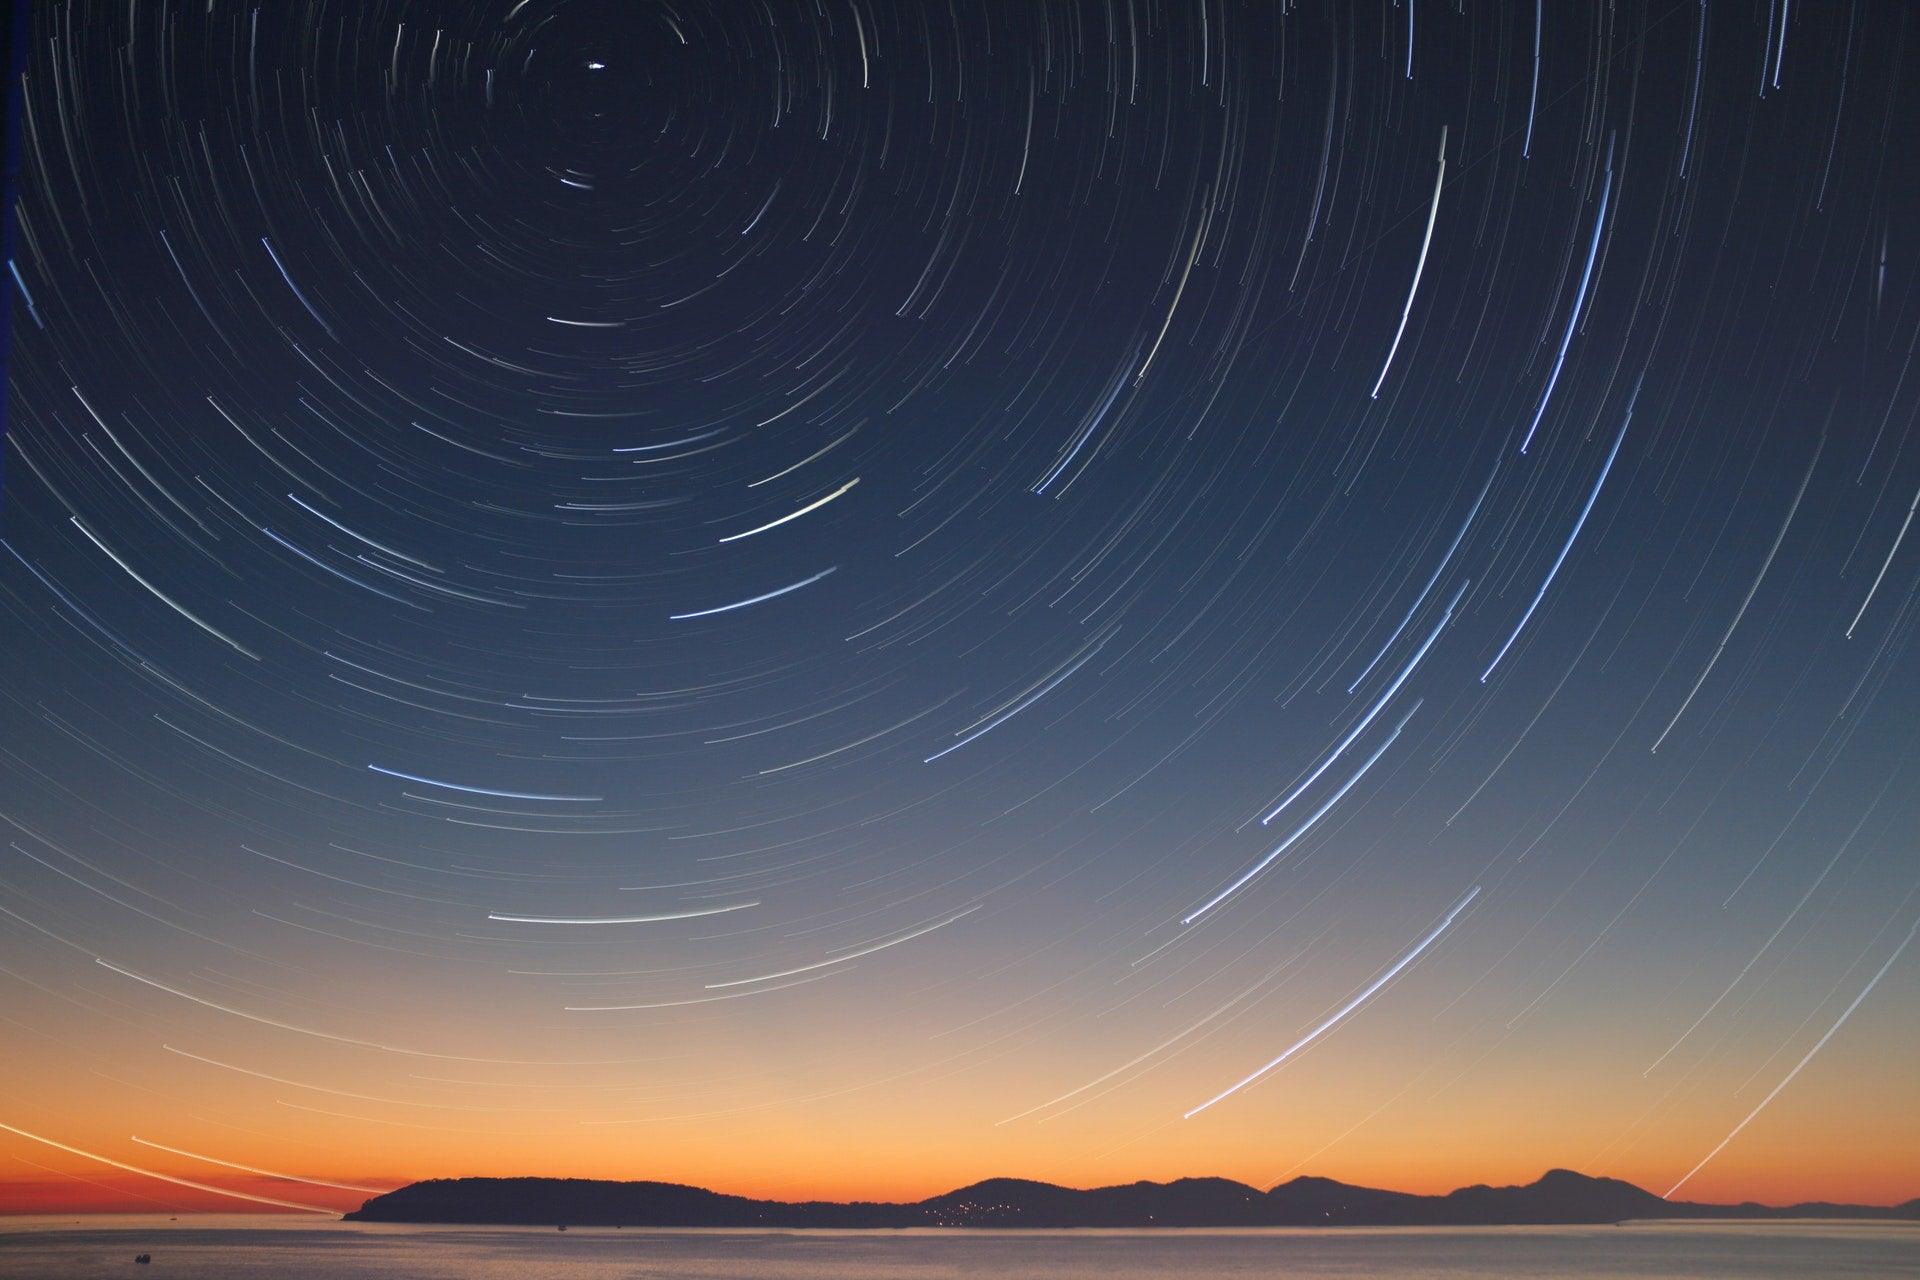
If you are checking out star trail images, you will notice two common types of trails. The first one looks like regular streaks in the sky. The other one has circular trails. The latter is more difficult as it requires you to determine the exact location to point your camera.
If you want to shoot circular star trails, you will have to locate the north or south pole. This depends on your location.
The Earth is divided into two.
If you live in the northern hemisphere, it is easier to search for the north pole. The opposite goes for those who are in the southern hemisphere.
Northern Hemisphere
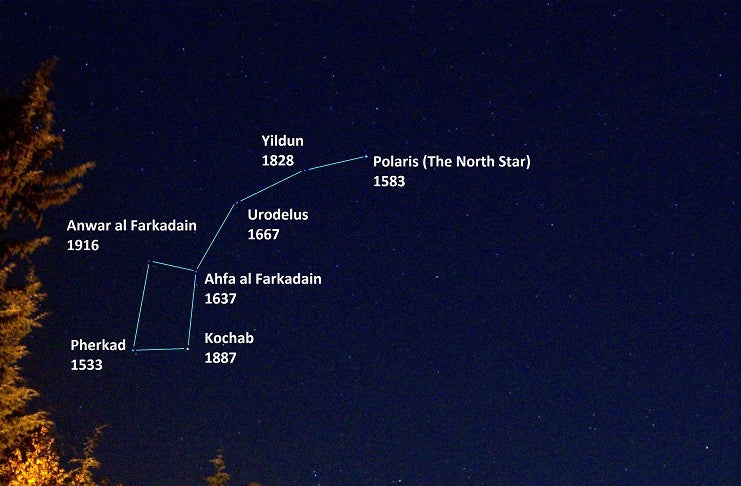
Those who are living in the Northern Hemisphere should check out for the Northern Star or Polaris.
Polaris is the brightest star in the northern hemisphere. It can be seen easier by locating the small dipper constellation. The last star on the dipper’s tail is the northern star.
But why is Polaris so important? How does it affect star trails?
The location of the north star is almost directly at the Earth’s axis. It does not change overnight, nor does it set or rise.
If you have seen circular star trails, the stars revolve around Polaris if taken in the northern hemisphere.

Southern Hemisphere
Moving on to the Southern Hemisphere, the counterpart of Polaris is harder to find. It is because the South Celestial Pole is not as bright as the northern star. But there is a way to find it.
The Southern Cross and The Pointers are constellations that can be seen in the Southern Hemisphere. But these are not directly beside the South Celestial Pole.
To locate Sigma Octantis, the “southern star”, you have to imagine a line passing through the southern cross stars.
Draw a line from The Pointers perpendicular to the imaginary Southern Crossline. The point where the two imaginary lines meet is the South Celestial Pole.
How to locate the Northern and Southern stars easier and quicker?
The technique mentioned earlier is difficult for the untrained eye. But due to technology, it is now easier to do astrophotography.
There are several apps in the Google Play Store or App Store that help in locating Polaris or the Sigma Octantis.
These apps use your location data to provide you with a real-time “augmented reality” view of the sky. Some apps instantly show the name of the stars as you point your camera towards them.
Sky Guide is a great app for iOS. It determines your location accurately and locating constellations or stars is easy.
For Android users, Star Walk 2 is a great free app to use. Just like Sky Guide, it is accurate and shows the location of the stars precisely. If a meteor shower, comet, or astronomical event is happening it will notify you.
What equipment should you use for star trail photography?
1. DSLR or Mirrorless Camera
You may use a DSLR or a mirrorless camera regardless of brand. What’s important is its capability of shooting in Manual mode. Your camera should also be able to shoot in “Bulb” exposure.

2. Wide-angle lens
Any lens is capable of taking star trails. However, using a wide-angle lens is preferred. It is also better to have a camera with a wide aperture of f/2.8 or lower.
Shooting with a fish-eye lens is also great. It offers a wider perspective compared to a regular lens. The shots taken with fish-eye lenses are also unique.
Though you must not limit yourself with wide lenses. Photography has no limits so you can experiment with a telephoto such as a 50mm f/1.8 or even a 70-200mm f/2.8 lens. Who knows, you might get a once-in-a-lifetime shot with this one.
3. Intervalometer
An intervalometer helps in taking photos continuously. It automates the process of taking multiple shots at a given amount of time.
You may also use your camera’s built-in intervalometer if it has one.
4. Sturdy Tripod
Always use a sturdy tripod when shooting star trails. Using one helps in composing your image while keeping your set-up stable.
A sturdy tripod also keeps your shot in focus in any condition. A sudden gust might ruin your image. Even tiny movements may introduce a camera shake which is less than ideal when taking long exposures.
Tripods such as the ProMediaGear TR344L or the ProMediaGear TR424L are both great options. They can support any camera setup. Plus, it is durable enough to last you several years.

5. Extra memory cards & spare batteries
Shooting star trails take up a lot of storage. A quick session can easily fill up a 16GB memory card. Before heading out to shoot, make sure that you have at least a 64GB card or a lot of smaller spare cards.
It is also better to have a card that has a quick read and write speed. This ensures that your shooting sequence is not hindered by the camera’s processing.
Shooting long exposures will also drain your battery quicker compared to regular photo sessions. Your camera will be open for several seconds, or minutes, and that sucks battery life easily.
Make sure to bring two or more spare batteries when going out for a shoot. If your camera can take photos while attached to a power bank, then that is better.
6. Headlights, tent, and food
Shooting star trails takes up a lot of time. If it is your first time, then it might take some trial and error before you nail your best shot.
It is better to head out prepared. Bring headlights and extra flashlights to illuminate your trail and location.
If you have a tent, you can set it up, so you have your own safe space. Also, do not forget to bring some food. If you are going to hike, there will be no convenience store near you for a quick snack.
Bring something to entertain you as well. Once your intervalometer is set and it is taking photos automatically, things might get boring. Some shots take an hour or more, so it is nice to have some form of entertainment to keep you busy. A companion is nice to have as well.

Check your location and plan ahead
Preparing all the necessary equipment is not enough to get you going. You have to prepare and study your location beforehand.
When shooting star trails, the goal is for your camera to capture light that cannot be seen normally. Hence, long exposure photography is involved.
However, you cannot achieve this with light pollution involved. If you attempt this in an urban area, your camera will capture the light from the city. This will overpower the light emitted by stars located a million miles away.
But if there is no dark location nearby, you can experiment with city lights as your ambient light. You can combine it with your star trail to create a unique image.
Another thing to consider is the moon phase. If it is a full moon, it may overpower the stars’ light.
The moon phase can be checked beforehand. Pick a date where there is no moon, or if it is on a quarter moon phase. These are the ideal situations.
Besides that, check the weather as well. Make sure that the skies are clear. Star trails are difficult to achieve under cloudy skies.
How to photograph star trails?
Now that you have your location scouted and all your gears prepared, it is time to finally take your star trail photo.
But before that, you must choose between the two common methods of shooting.
- Extra-long exposure- 30 mins or more for one shot
- Image stacking - short exposures that are combined to show star trails

How to shoot star trails using a very long exposure value?
This method might seem easier as you only have to take a single photo every time. However, you must take note of several things such as the lens you are going to use.
To explain further, you need a fast lens with a wide aperture of f/2.8 or higher. This allows the camera to take in as much light as possible.
Another thing to consider is the weather condition and moon phase. You need to shoot under clear skies during a new moon.
But why?
If the moon is up, your exposure value will be limited to 10 minutes. Anything longer and the moonlight will start to affect your image. The darker the situation, the better.
Try to do quick test shots first then compute the equivalent shutter speed length. Doing so makes it easier to determine your settings for an hour-long exposure.
Some photographers test their settings by using a higher ISO. This allows them to take the correct exposure without considering noise. Once done, the settings are calculated based on the exposure triangle.
Step by step guide:
-
Set your camera and compose your image. Make sure that the moon is not seen anywhere.
-
Take a test shot using the widest aperture available at the lowest ISO setting you can.
-
Try a 30 second exposure and see if the stars are visible. If not, adjust the aperture or the ISO depending on your equipment.
-
Once the test shot is good, set the shutter speed to 15 minutes. Double the exposure time for every test shot while adjusting the ISO or the aperture to get it right.
-
Based on your test shots, set the ISO and aperture properly with an hour-long exposure in mind. A 60-minute exposure will produce star trails.
However, going for 90-minutes is better if possible. This makes the circular star trail more prominent if you are pointed at the north or south star.
-
This process takes a long time, waiting for an hour or two for one image requires a lot of patience. Review the result and adjust accordingly.
Additional tips
-
Darkness is your friend. Keep in mind that it is better to shoot without the moon. You may also shoot before moonrise or once the moon has set.
-
Bring a lot of batteries or attach your camera to a power bank if possible. A 60-minute exposure may drain your battery quickly. You may even end up spending a battery for one shot.
Why should you not use this method?
There are several downsides to shooting a single long exposure. Worse, it may even damage your camera’s sensor.
-
Shooting for a minute or two can heat your camera’s sensor. What more if it is 60-minutes or longer? The first several tries might be fine for your camera. But in the long run, this may lead to noise or hot pixels in your image. If it is too hot, then your camera’s sensor may be ruined.
-
You will have no control over other elements such as clouds entering the frame. If you are shooting for a very long time, you might not notice small patches of clouds entering the frame. This may end up ruining your photo.
-
Battery problems may happen this time. If you are shooting and your camera dies, you will end up with nothing. A camera powering down unexpectedly will not process the image.
-
The foreground may be overexposed. Despite having a dark sky, the stars are enough to light up the foreground. If not controlled, the image will have an overexposed foreground making it unusable.
-
Time may be wasted. When shooting with this method, you may end up with one unusable image. You will end up wasting your time waiting for nothing. However, you learn a thing or two about shooting star trails.

How to shoot star trails using multiple short exposures?
With the downsides mentioned earlier, this method is highly suggested. You do not have to wait long hours. Plus, you can adjust your settings accordingly. However, this method will eat up a lot of memory space.
Step by step guide
-
Compose your image and make sure that the camera is stable.
-
Turn off in-camera noise reduction and take a test shot using a 20-second shutter speed. Adjust the settings depending on the result.
-
Once the settings are perfect, prepare your intervalometer.
-
Set the intervalometer, either in-camera or not, to take multiple shots.
-
For short star trails, set 50 images. For longer or circular star trails, you need at least 200 shots. The more shots you take, the more prominent the star trails.
-
See to it that there is no delay between one shot to another. It is ideal to have less than one second between shots. If it is longer, you will have star trails that look like it is skipping from one point to another.
-
Set your white balance properly. Star trails are better taken at around 3000k - 4000K. However, you can go for auto white balance as well. Just make sure that you are shooting in RAW to keep all the details.
Why should you use this over the long exposure method?
-
Shooting shorter exposures reduces the strain on your camera’s sensor. It prevents overheating that causes hot pixels.
-
Monitoring your images would be easier. If an unwanted object can be seen, you can easily take it out.
-
For longer star trails, you do not have to wait several hours to get one for it to end up a bust. You can shoot hundreds of 20-second exposures and combine them in post for a long trail image.
-
Checking the foreground is easier as well. Compared to a very long exposure, you can expose the foreground and background easily.
-
The multiple images you take can be used for a timelapse video. Just place it on your video editing software and the result will be stunning.

How to process multiple exposures into a single star trail photo?
Shooting multiple images is not the end of your shoot. You still have to process those images and stack them together to get your final product.
The most popular software for image stacking is Adobe Lightroom and Adobe Photoshop. Lightroom takes care of image adjustments while Photoshop combines all the images.
If you are not familiar with the Adobe Creative Suite, you may use ImageStacker or DeepSkyStacker. It is kind of a shortcut as you only have to load the images and it will combine them automatically.
That being said, before loading your image into photoshop, you have to take care of several things first.
- White Balance
- Exposure and contrast
- Highlights and shadows
- Black and white
- Clarity
- Dehaze
- Sharpness
- Noise reduction
These steps can be done via Adobe Lightroom. It is necessary to process your images for a cleaner, sharper, and better final image.
Once you are done processing the images, here are the next steps in Adobe Photoshop.
- Load all your images into Photoshop.
- Select all images in the layers panel. Set the image blending mode to lighten.
That’s it! Your star trail image is done!
If this method does not work well with you, there is another option. But it may take more steps.
- Load all your images into Photoshop.
- Go to the Layers panel and head to the second to the last layer. Set the blending mode to lighten.
- Right-click on the second to the last layer then click on “copy layer style.”
- Select all the remaining layers.
- Right-click on all the selected layers. Click on “paste layer style.”
This method is the longer version of the technique mentioned earlier. However, the concept remains the same - all layers should be set to “Lighten”.
Additional Tip
-
If your image needs more tweaking, feel free to experiment with your settings. You play around with the white balance, exposure, curves, and many more in Photoshop as well.
-
You may also combine all the layers and flatten them into one. This tip makes it easier to work around when adjusting your image.
Summary
In the end, star trail photography is a great activity that everyone should try. The results are stunning and worth capturing.
However, this is not an easy task. There are a lot of challenges to overcome to make a spectacular star trail image.